Battling is one of the best ways to advance in the game: battle success figures heavily in the game score, GE progress is easier, and, most importantly, it’s fun to exert your will on others. One of the most typical game experiences goes from enjoying the battles to worrying about the battles to dreading the battles. This experience usually comes from 2 factors: aging up too quickly and not having a well-planned town which has room for barracks yet enough resources to pay for troop replenishment.
This post will assume that you’ve followed the techniques from part 1.
Even though it’s strongly recommended that aging up is done deliberately so that your town stays militarily strong in comparison with your typical hoodies, you may have only come late to the realization that slow and steady wins the race. Don’t despair! It’s never too late to try fighting. The boost on the enemy units (which we’ll refer to as AI units) increases as the age gets higher. As we’ll discuss shortly, this means that even if you struggle to win many battles in GE, your military might still be strong enough for GvG battling in an earlier age.
Which Military GBs Should I Target?
Even though several GBs have an effect which improves your ability to battle, these ones should be targetted first:
- Zeus
- Cathedral of Aachen (CoA)
- Castel del Monte (CdM)
- Alcatraz (Traz)
Since the BPs you pick up from quests, incidents, GE, treasure hunt and Shrine of Inspiration come from your age or lower, it’s easier to get BPs and goods for the GBs in the order listed above. Also, even though each of the 1st ten levels on the Zeus, CoA and CdM adds 3% to both the attack and defense portion of your military boost, the lower age GBs take fewer FPs per level. And as with all GBs, the higher levels take more FPs than the earlier ones. For example, taking a Zeus from level 3 to level 4 takes only 150 FPs, while taking a CdM from level 5 to level 6 takes 440 FPs. For a fighter, you’ll eventually want all 4 of these GBs at level 10 and beyond but tackling the lower levels of each will get you the same military benefit, at least until level 10.
Please note: the 3% military boost referred to above affects your units when you are the attacker. It has no impact on your city defense.
As you will see reinforced throughout these posts, there are many benefits to aging up at a measured pace. One of the pre-requisites tasks you should complete in an age before moving up is to plant the military GB from that age.
If you decide to pursue the GBs organically, i.e., not chasing GBs from future eras, you will not get Alcatraz until Progressive Age. Since Alcatraz is really a necessity for any serious GvG fighting, it is the most likely exception to that rule for most fighters. Because it’s so valuable for troop production used for fighting, sieging and laying defensive armies, many guilds will make it easier for you to acquire the goods for building Alcatraz, assuming you get the BPs.
Military Boosts
It’s highly recommended to achieve a sufficient military boost before aging up. There are a couple of decent benchmarks to use: one based on GvG and one based on GE. They are pretty consistent up to PE.
The GvG-based approach uses the HQ bonus for each age as the basis for a target then adds a reasonable buffer.
| Age | HQ Bonus | Target Military Boost |
|---|---|---|
| Iron | 25% | 35% |
| EMA | 35% | 45% |
| HMA | 45% | 55% |
| LMA | 55% | 65% |
| Col | 65% | 75% |
| Indy and up | 75% | 90% and above |
The GE-based approach does the same thing. The table is located here. about 70% of the way down the page. The section is called “Enemy Defending Army Bonuses”. Notice that the enemy unit bonuses rise rapidly from 0% in tier 3 Iron Age and EMA up to 120% in tier 3 OF. And tier 4 boosts are even more drastic: from 50% at the end of Iron Age to 260% at the end of OF.
Traz + RH: Battle Game-changer
The final piece of the puzzle is the combination of Alcatraz plus at least one rogue hideout. If you’re a fighter, use the 4 major events and the achievable daily challenges to target rogue hideouts until you have it. Ignore everything else until you have it. You’ll read posts in the message threads about how everyone is excited about a building set that gives FPs/Goods/Happiness/Attack Boost/City Defense/Guild Power. I repeat: ignore them. The rogue hideout is all that matters until you have at least one.
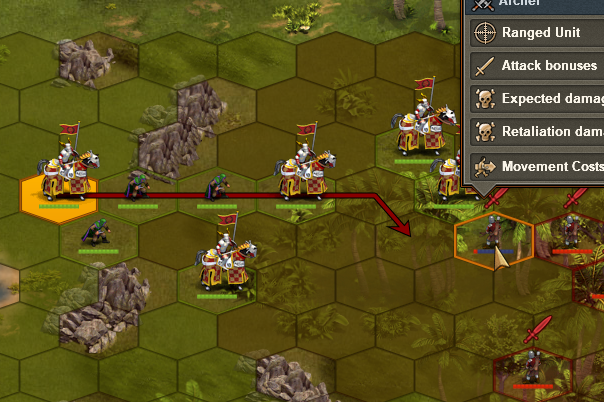
Once you have a rogue hideout placed in your town, Alcatraz will begin to produce unattached rogues. You will want to take steps to allow as many rogues to be produced as possible, particularly in the early going. That means that as soon as you have both in your town, get rid of all other barracks (store champ retreats, drummer schools and color guard camps, and delete all other regular barracks). For now, you’ll need to rely on GE to produce troops. You’ll eventually build up enough rogues and familiarity with using them in battle that you will use 1 non-rogue unit (or seed unit) plus 7 rogues in most battles. As you learn how many rogues you go through each week, and build up a sufficiently high number of rogues, you can adjust and lay down barracks depending on your age and your guild’s focus. Your Alcatraz will produce units depending on the barracks in your town, whether connected or not, whether fully built or not. Say you have 4 hideouts and 1 champ’s retreat. If your Traz produces 10 units, you’ll get 8 rogues and 2 champs on average.
You should look for low-risk opportunities to learn rogue use. The early stages of GE are a great place to experiment. Some points to remember:
- never go into a fight with only rogues
- the first time each rogue gets hit, they’ll turn into the same unit as the seed unit
- the seed unit needs to be protected. If ever that seed unit dies and you’re left with only unconverted rogues, you need to surrender immediately because each rogue will then die with one hit from even the weakest enemy unit
As your military boost increases, you’ll notice that certain options become available to you as your unit abilities become stronger. For example, your fast will go from taking down an enemy heavy in 5 hits to 4, 3, 2 and sometimes 1.
The important thing is to keep fighting and using the results you get as feedback providing input on where your town needs improvement.


What are some of the stronger or more preferred seed units?
While that question can really only be answered by knowing what age and in what capacity you’re fighting (GE, GVG, etc), for battle heavies and fast (champs in many ages) are generally good seed units to use. If you’re looking for answers to specific battles, let us know what they are and we’ll be happy to offer advice based on our experiences. 🙂
Currently in CE and trying to work out best battle combinations for each level of GE. Have CdM and Zeus at level 11, and Aachen is at 10. What attack boost do I need to fight to end of level 4?
CE is like the golden era for GE, because with a single AAV (anti-aircraft vehicle) and seven rogues you can typically fight all of it. You just park your AAV off in a corner and then hit “auto finish”. Sometimes you take heavy losses with this method, but 99% of the time you will win. Ideally you want your attack boost somewhere around 120%-150% for this to work well, minimum. You’ll see what your boost is in your town hall. The fighting trifecta will make up most of it, but there are other special event buildings that help, too. 🙂
I am in CE era.. My CDM is 10, Zeus is 11 and CoA is 8.. Have 2 rogue hideouts.. What boost from tavern should i use while GE?
Keep working to get that CoA to 10, and if you haven’t yet, plant Traz to give you more rogues. 🙂
Ideally use the 30% boost for 24hrs, but the 20% one for 4hrs will work well too. Just tuck an AAV back in a corner and let rouges do the rest of the work. That’ll work for 99% of CE battles for you in GE.