Table of Contents
You can jump to any section using these links, or feel free to just read through the entire article if this is your first time here.
- Overview
- Just a brief overview of what locks are.
- Oh Yay… Math
- The actual math behind the locks and making a GB safe to receive them.
- Working Example
- An example GB (with images) to apply the math to.
- Another Way to Look at It
- The math written out as verbal steps instead of a formula.
- Looking at it Visually
- The math shown visually in pie chart format, based on the same example as in Working Example. Touches on cost savings for locks versus swaps.
- If You Get a Negative Number
- What to do if the math gives you a negative number for an answer.
- How it Works
- Explaining how the math works.
- Why Locks are Best
- Explaining the cost savings by using locks over swaps.
Overview
One of the great features of having friends or mates with Power Arc is that you can ask them to give you a lock. In truly supportive guilds this means non-profit locks, and there’s a thread where you can request them; but only if you’ve made the spots you want locked safe.
To make a spot safe means to self-donate enough FPs to ensure that no one can pass that spot. You need to make the spots you want to request safe because a Power Arc is going to be giving you their time and loaning you their FPs to level your GB. Note that important word, loaning. This means they’re going to be using packs to make sure that they lock you, and neither profit nor take a loss. This being the case, they’re not going to take a risk that could wind up costing them FPs, because that would mean they cannot turn around and help someone else as easily. This is why making a GB safe first is essential.
There is a simple math formula to determine how many FPs you must self-donate to your GB to make it safe. In case it’s not clear, this isn’t the total FPs donated to the GB, but the number of FPs that you alone must donate. Unless the Power Arc in first (and possibly second) are feeling generous to take a loss (if they offer, you’re very lucky) and help you make the next spot safe, you’re solely responsible for this. 😉
Most Power Arcs do not go past Level 80, and so the standard non-profit rate is 1.9. This is because they get a 90% bonus return, so you multiply by 1.9. The 1 stands for 100% (so the base reward), and 90% is 0.9, so an additional 0.9 on top of 1.0 is 1.9. For the purpose of this article, all locks will be considered to be done at 1.9. This formula works regardless of lock rate, you just have to change your lock multiplier.
Lets take the formula slowly, breaking it down into small bites so it’s easy to understand, and then finally showing it in action with some examples.
Oh Yay… Math
The Components:
X=Self Donation Amount
Y=FPs on the GB Already
A=Total Cost to Level
B=Reward for First multiplied by 1.9
C=Reward for Second multiplied by 1.9
D=Reward for Third multiplied by 1.9
E=Reward for Fourth multiplied by 1.9
F=Reward for Fifth multiplied by 1.9
When you do your multipliers for B, C, D, E, and F make sure you round up if you get a decimal. FoE does not give out half a FP, so they always go up to the next whole FP. For example, if you have a reward spot for 55 FPs, when you multiply that by 1.9 you get 104.5 FPs. So the reward for that spot for a Power Arc would be 105 FPs.
The Formulas:
To Make 1/2 Safe: X=A-(B*2) You will almost always make 2 safe by making 1 safe. It’s very rare that it doesn’t happen. Making 1/2 safe first, before anything else, helps prevent sniping.
To Make 3 | 4 | 5 Safe: X=(A-Y)-(D*2) | X=(A-Y)-(E*2) | X=(A-Y)-(F*2) Do these one at a time. Make 3 safe, get it locked, then make 4 safe, etc. To prevent the snipe. Note that you cannot make a spot safe if it does not give a FP reward.
Alternatively, if you’re willing to take a risk, you can make multiple spots safe all at once. That looks like:
X=A-(B+C+(D*2)) for 1/2/3
X=A-(B+C+D+(E*2)) for 1/2/3/4
X=A-(B+C+D+E+(F*2)) for 1/2/3/4/5
Any of these formats can be typed into your cellphone calculator (or any calculator that allows the use of parentheses) with the values replaced with what you need to get your lock point. You could even do it in the following fashion:
X=A-((B*1.9)+(C*1.9)+((D*1.9)*2))
That’s just one example from the many formulas above, but you can do it with any of them (just mind your parentheses). For this one though you don’t multiply the rewards by 1.9 before plugging them into the formula. This final one will do it all at once.
Working Example
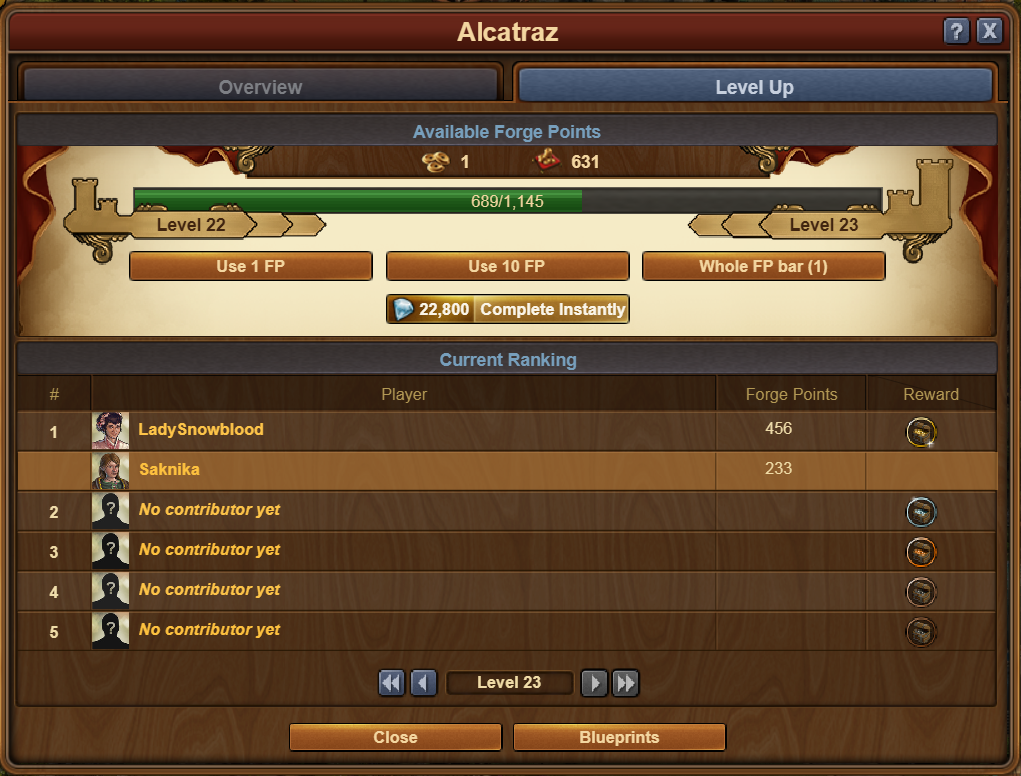
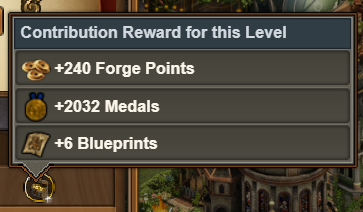
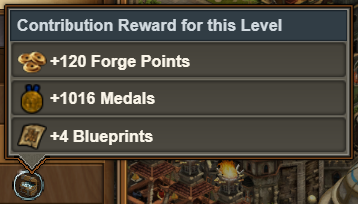
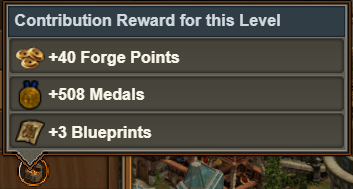
So for this Traz, to get to Level 23 you need a total of 1,145 FPs. The reward for first is 240 FPs, the reward for second is 120 FPs, and the reward for third is 40 FPs. Therefore…
A=1,145
B=456 (240*1.9)
C=228 (120*1.9)
D=76 (40*1.9)
Our math to make 1/2/3 safe thus looks like:
X=A-(B+C+(D*2))
X=1,145-(456+228+(76*2))
X=1,145-(456+228+152)
X=1,145-836
X=309
This means that to make 1/2/3 safe, the owner of this GB has to donate 309 FPs.
As we can see though, they have not donated that many. Therefore, they cannot have 3 locked! This isn’t an issue though, because you don’t really want to have 3 safe before you get 1/2 locked. So here’s what it looks like to make just 1/2 safe:
X=A-(B*2)
X=1,145-(456*2)
X=1,145-912
X=233
This means to make 1/2 safe, the owner of this GB has to donate 233 FPs, and seeing as they have, the GB is safe for 1/2.
Now, if you want to add a 3 to that equation, after 1/2 have locked in, the math looks like:
X=(A-Y)-(D*2)
X=(1,145-917)-(76*2)
X=228-152
X=76
This means to make 3 safe after 1/2 are taken, the owner of this GB has to add another 76 FPs to what they have already donated. So that’d be 233+76=309, or the total you get to make 1/2/3 safe all at once. So no extra FPs by doing this method of 1/2 first, then 3, but it does mean you’re safe from snipers! Or safer, anyways. 2 could still get sniped after 1 is taken, but that’s a lot better than 1 getting sniped because you made it safe for 1/2/3 all at once.
Another Way to Look At It
Is the formula hurting your head? Even with the example? Okay, here’s another way to think about it then. This will be entirely written out, no formulas, so hopefully this helps bring it all together for you.
Step 1: Look at your GB and multiply the reward on 1 by 1.9. If you get a decimal, round up to the nearest whole number. So for example, 104.5 becomes 105.
Step 2: Multiply the answer from Step 1 by two. AKA double it. So 105 would become 210.
Step 3: Subtract the answer from Step 2 out of the total number of FPs it costs to level your GB. The answer you get is your self-donation amount to make 1/2 safe.
Step 4: Once 1/2 is safe, look at your GB and multiply the reward on 3 by 1.9. Same rule applies for decimals, round up if you get ’em.
Step 5: Multiply the answer in Step 4 by two. AKA double it.
Step 6: Subtract both the answer you got in Step 5 AND the total FPs already on your GB from the total needed to level it. The answer you get is how many additional FPs you need to self-donate to make 3 safe.
Rinse-Repeat: You can repeat steps 4-6 again for making 4 safe, and then 5 safe as well if there are FP rewards available.
Looking at it Visually
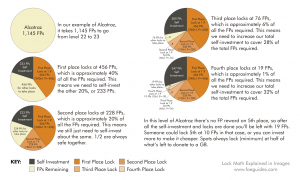 If you want to see the same example as above, but visually, this image will do that for you. The dark brown color is what you personally are adding to the mix, and all the various bits of darker orange are locks, while the final bit of that peachy-orange is how much remains on the GB. So you can visually see how much space a lock takes up, plus an equal amount to it as extra space for more locks, and finally what you need to donate. As you get locks, things change. So the pie in the top-left is the total FPs on the GB not yet invested at all. Middle-left pie is after first place is locked, and the bottom-left pie adds in second place. Remember, 1/2 are always safe together, and this visually shows how that is. Since second place is almost always 50% of what first place is (or more), it works out this way. Then, the top-right pie shows adding in a third place lock. Since third place doubled is less of the pie taken up than previously, now we have to add in more to our self-investment to fill in the blank area. The middle-right pie (and our final one) shows adding in fourth place as a lock, and again we need to meet up with the remainder. Since you can always lock a spot on a GB by donating half of what is left, your self-donation always has to reflect that.
If you were to do this same GB through the swaps though, just general swaps, you can expect your self investment to match the very first pie in the top-left, instead of the very last pie in the middle-right. That’s a big difference. This is why having the ability to receive locks is so huge. While this pie chart example is for 1.9 locks, it’s only going to be about a 15%-30% difference using 1.8 locks (or similar). That’s still a lot less than having to donate 100% of it yourself. In this example we end up with a self investment of about 32%. That’s a 68% cost savings to us using locks instead of swaps. You always use your coupons at stores you love don’t you, so why not treat the lock thread as coupons for your GB?
If You Get a Negative Number
This is very important! Like, super duper important! If you get a negative number for an answer to any of the formulas, then that means the spot it automatically safe without adding any FPs. This is known as a clean lock, and with a 1.9 donation rate all GBs have a period of time where this happens. These are known as fast levels. Do not, I repeat, DO NOT add any FPs to a level of a GB where this is the case, until all safe spots that can be clean locked are taken. Some GBs this will only be 1/2 (like Traz), but others you will have a period of time where 1/2/3 might be safe (like Arc). Adding in FPs before these spots are taken drastically increases the risk you will be sniped, and makes the snipe that much worse to you.
How It Works
So the reason this formula works is because of the last bit of it, where you multiply the lowest spot you want locked by two. This is because you want to leave the ability for other BPs to be gained by the rest of your guild mates, and you want to make sure you can double-dip if desired. If you didn’t multiply the lowest lock spot by two, then the total you self-donate will be every FP other than what you get from the Power Arcs. In other words, your Power Arcs will end up leveling your GB just by locking in without multiplying the last spot by two.
Multiplying it by two leaves the same amount behind as what that last lock spot is being taken at. The first person to add that number of FPs to a GB secures the spot, so even if your Power Arc locks 3 at 48 FPs for example, since there will only be 48 FPs left this means no one can surpass them. So in our example above, with getting just 1/2 locked, there will be 228 FPs left after both have been locked.
This is also why it doesn’t matter how many FPs are being used to lock the spot, the formula will always give you an accurate self-donation point. The formula will work no matter what numbers are plugged in. It’s a beautiful thing.
If you need help, please post questions below, or contact me (Saknika) in-game. It seems complicated at first, but it gets easier once you work with it a bit. Happy leveling!
Why Locks are the Best
Thank you to HossamAly of the UK server for this tidbit, modified only for relevance here.
Let’s pick the Arc for example (but the same analysis applies to all GBs, perhaps with slight variations in actual leveling time reductions). Leveling your Arc from level 10 to 30 requires 25,406 fps in total. If you receive 1.9 locks it costs only 8,633. In other words the locks pay for 67% of the cost for these levels!
Leveling your Arc from 30 to 60 requires 71,540 fps in total. With 1.9 locks it costs only 3,199. In other words the locks pay for 95% of the cost for these levels!
So if, say, your income is about 100 fps per day. You’ll be able to get from Arc level 10 to 30 in about 86 days with 1.9 locks, and then it’ll only take you 32 days to get to level 60. So 118 days in total (about 4 months).
Now let’s compare that with how long it’ll take you to get there with swaps (general or otherwise). Of course you can’t have an exact figure for swaps because sometimes you get rewards. So lets assume a VERY optimistic scenario where you get 50 fps as a reward for each 100 fps you swap. People used to swaps know that this is unrealistically optimistic, but let’s compare it with the locks case anyway.
Assuming the same 100fps daily income, it’ll take you 130 days to get from level 10-30, compared with 86 using locks. And then it’ll take you 350 days to get from level 30 to 60,compared with 32 days with locks. So four months versus a year (or more). That’s at least 75% faster!
Who wouldn’t want those kinds of savings, and that kind of time frame?
Having trouble with the math? Need a quick fix? Here is a calculator that you can use. Just plug your numbers in, and it will do the math for you. We still encourage learning the math because it’s faster and easier, but sometimes you just need a little help. The calculator is not on the site though, so please click here to be taken to Google Sheets to use it.


Trackbacks/Pingbacks