As with any good game, the further you go in FoE, the more complex things become as it pertains to keeping your city running. In Progressive Era (PE) we saw the addition of two-lane roads, come Modern Era (ME) we then had to start refining goods and then in Tomorrow Era (TE) it became re-refined goods; and now in Arctic Future (AF) we are introduced to the Arctic Harbor and then in Oceanic Future (OF) we meet its cousin, the Oceanic Terminal.
These two special areas are introduced in their respective eras because we are also introduced to the concept of special goods–goods that you cannot trade for, you must produce them yourself. Since there’s no way to trade for them, this makes them extremely valuable and the sole limiting factor to how fast you can advance through these two eras… and eras beyond them. Yes, that’s correct, once the special goods are introduced they’re here to stay.
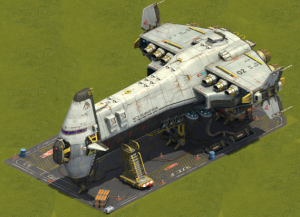
In the Arctic Future we are introduced to Promethium, which we can mine from the ocean by setting sail from the Arctic Harbor. Come Oceanic Future we’re also going to need Orichalcum, which we can find on the ocean floor in our submarine that takes a deep dive out of the Oceanic Terminal. Both of these work in exactly the same way, they simply gather different resources for us. So from here forward I am not going to specify between the two eras and am simply going to discuss how the process works and some general tips to keep in mind.
First and foremost, it’s important to unlock the harbor/terminal as soon as you can. The sooner you get it unlocked, the faster you can start gathering the special resource. Since you need a lot of them to get through the tech tree, the sooner you start mining the better. The initial unlock isn’t going to yield much at base amount, but as you upgrade your harbor/terminal that base number will increase. This is important because your crew members are going to affect how much you bring in using that number as a base amount.
Ideally, you always want to pick crew members that are going to increase the number of special goods you’re bringing back, and never pick ones that will decrease it. You must fill all your crew slots before you can send them off to work, and you can only shuffle the selection (called exchange) once for free per trip. Every exchange beyond that costs 25 diamonds, and in most cases it’s not going to be worth spending them to do so.
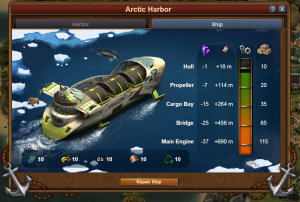 Before starting any journey, the first thing a good captain does is check the vessel. In this case it’s important to note that after every trip made your ship/sub is going to take damage. The amount of damage taken (and accumulated) will affect how long your excursion will last and how much of a special good you can bring back–negatively. It costs goods to repair the vessel, and the number of goods is directly proportional to how damaged the vessel is. So basically, the worse the damage, the more costly the repairs. That being said it is extremely wise to get in the habit of repairing the vessel before every excursion. Doing so ensures that you are always bringing in the maximum amount of special goods that you can, in the quickest time possible. It’s also just more cost effective overall to keep up on the repairs before they become catastrophic. So step one before all journeys should be to repair the vessel.
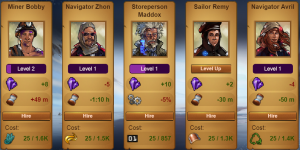 Step two then is selecting crew candidates. Each candidate will offer you something unique, but the ones you want to bring on board as top priority are the ones that will increase the amount of the special good you’re attempting to bring back. The more you hire a specific candidate the more experience they will earn, and you can then in time level them up which makes them more efficient. The key thing to note with the crew candidates however is that they don’t work for free–so you’re either going to have to pay them some goods, or sometimes they will ask for medals. Regardless, you once again are going to pay a resource to further fund the mining expedition.
When it comes to crew selection it should be noted that you only start with three available slots and a handful of candidates. This means you’re likely to see the same faces frequently, and thus concentrate their experience gain accordingly. As you move forward in the tech tree you will both unlock more slots for crew members, and you will unlock additional crew members. A fully leveled-up Arctic Harbor and Oceanic Terminal will each have a candidate pool of 19 members. In the beginning you start off with 10.
 As stated previously though, giving crew members experience allows you to eventually level them up. Once again, leveling them up costs goods, but it does make it so the crew member will work harder for you. The higher the level they’re moving to, the greater the cost in goods to move them to that level.
 At this current point I have not encountered a maximum level to a crew candidate, but I suppose the possibility exists… eventually (for reference I have spent at least half a year total now, if not closer to a full year between AF and OF and I’ve yet to find I’ve hit max level for a candidate). If it does though it will take a while to get there, so you may decide long before that happens that you do not wish to spend the goods to level a certain candidate up any more, and that’s fine. Correction, maximum level on a crew candidate is 10, but as I surmised previously it does take a while to get there, and you might not want to be bothered. You have to strategise your game to your play style.
It’s worth noting as well that negative effects do not necessarily get better when you level a crew member up, they might get worse. For example, a crew member who will affect the hull by adding 5% damage during the trip will likely level up and at their next level might cause 6% damage to the hull now (instead of 4%). However if they’re giving you more of those sweet, sweet special goods it’s totally hashtag worth it.
What a crew member will offer you is pretty straightforward in most cases. Main attributes are adding or subtracting travel time, adding or subtracting special goods, and adding or subtracting damage to the vessel. There are a few unique ones though; the teacher who increases experience gain for the crew members on that mission, the treasure hunter/scavenger who will bring you back a random gift (hovering will show you what you might get), and twins/triplets who when used as a set will amplify each other’s gains.
Once you’ve made your selections, then it’s time to send the vessel off on its journey to bring you back all the pretties. Upon return you collect it, and then send it off again. For most players this will be a daily task, as the timer will run about 15hrs a trip on average. The chances of getting to collect twice in a day are slim, unless you collect as soon as you wake up and then once more during the day… which cannot happen often when it takes over half the day to make a single run.
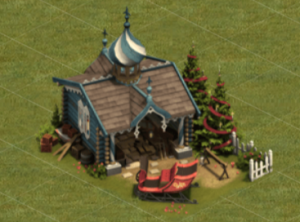
It’s important to note as well that the cost of goods will add up, so you’re going to want to secure the means to create the goods for running these items as soon as possible. The best method at the time of this writing is to have sleigh builders. Sleigh builders are a special production building that you can purchase in the Antique Dealer or win during the Winter Event (where they were first introduced in 2018). These plucky little 2×3 buildings will make you 15 current-age goods a day (no need to refine anything), which is 3 of each good. This is huge at this point in the game, so definitely keep your eyes peeled. 3-6 of these bad boys set to AF and OF each will keep your vessels running for a long time to come. At present these are the most space-efficient way to do this as they are far smaller than a Tribal Square and do not require any motivation to make them work. On the downside though they can be plundered, which could easily throw a wrench into your plans if you get unlucky.
 If you want to avoid the Arctic Harbor and Oceanic Terminal, or at least not need to rely on them quite as heavily, you can also consider planting Space Carrier (SC); which is a GB that offers possible rewards for the first few successful negotiations in a day and special goods once you’re in at least AF (prior to AF it will give medals, so no you cannot stock up on special goods in advance). As this is the Space Age Asteroid Belt (SAAB) GB though, it’s extremely expensive both to obtain ahead-of-age and to level up in terms of FP costs.
So what do you need the special goods for? The biggest reason you need them is the tech tree. Starting in AF and continuing forward you will need the special goods in addition to regular goods to unlock tech and continue to advance. In addition, if your play style is to negotiate a lot of the time, GE Tier IV will ask you to give up special goods sometimes to succeed. You will also find on the continent map (c-map) that some sectors require the special goods to negotiate you taking the province. A fighter ideally will only be spending the goods on the tech tree, but a negotiator is going to need the goods in all three places, which means that they’ll need more of them and thus really want to consider the SC as soon as they get into AF (if they haven’t already). For this reason it’d be wise to be complete with your Arc so you can get the BPs for SC, and fund it, far easier than otherwise.
So the three things you need to remember as being most important about the Arctic Harbor and Oceanic Terminal are:
- Unlock them as fast as you can in the tech tree, nothing else matters (except perhaps a troop to fight with, but that will likely come with the process of unlocking the harbor/terminal).
- Always repair your vessel before making another journey.
- Always aim to bring back as much promethium/orichalcum as you possibly can on a journey.
The Arctic Harbor can feel very overwhelming at first when you get into AF, but after a while it will become second nature to run. By the time you reach OF (and it will take some time if you don’t get really aggressive with SC) you’ll be an old hand at running the ship so the sub will be an easy task (since they operate exactly the same way). Happy mining!
Trackbacks/Pingbacks